Sand casting is one of the oldest and most widely-used methods of metal casting, dating back to around, and even before, 10,000 BC.
The process employs sand for the main mold material, as this material can be shaped and compacted to form a variety of complex and large cavities for molten metal that will eventually be turned into metal castings for a host of different applications across numerous industries.
Sand casting consists of eight main steps, each of which will be covered in the following sections of this guide.
With an understanding of how this process works in a step-by-step manner, you’ll have the information you need to better decide whether or not this ancient casting method is the right fit for your next custom metal parts project.
The sand casting process begins with the creation of a pattern, which is a replica of the final product that is to be cast.
Since the pattern is used to shape the mold cavity, it must have the same dimensions and shape as the final product, yet will usually be slightly larger to account for the shrinkage of the metal as it cools.
Patterns can be made from various materials, depending on the complexity and size of the product.
The most common types of materials used for creating patterns include wood, plastic, and metal, and the choice of which material to use for the pattern will depend on the requirements of the project.
Whichever the choice of material, the pattern will always include certain features that help with the molding process.
For example:
The following steps are taken to create the pattern during sand casting:
1. The material and design are chosen for the pattern.
2. The sand and the molding box are prepared.
3. The pattern is placed in the drag and the sand is packed around it.
4. The drag is turned over and the pattern is removed.
Creating the pattern is not only the first step in sand casting but also one of the most important ones, as it establishes the shape of the final product, albeit with some slight modifications to adjust for shrinkage.
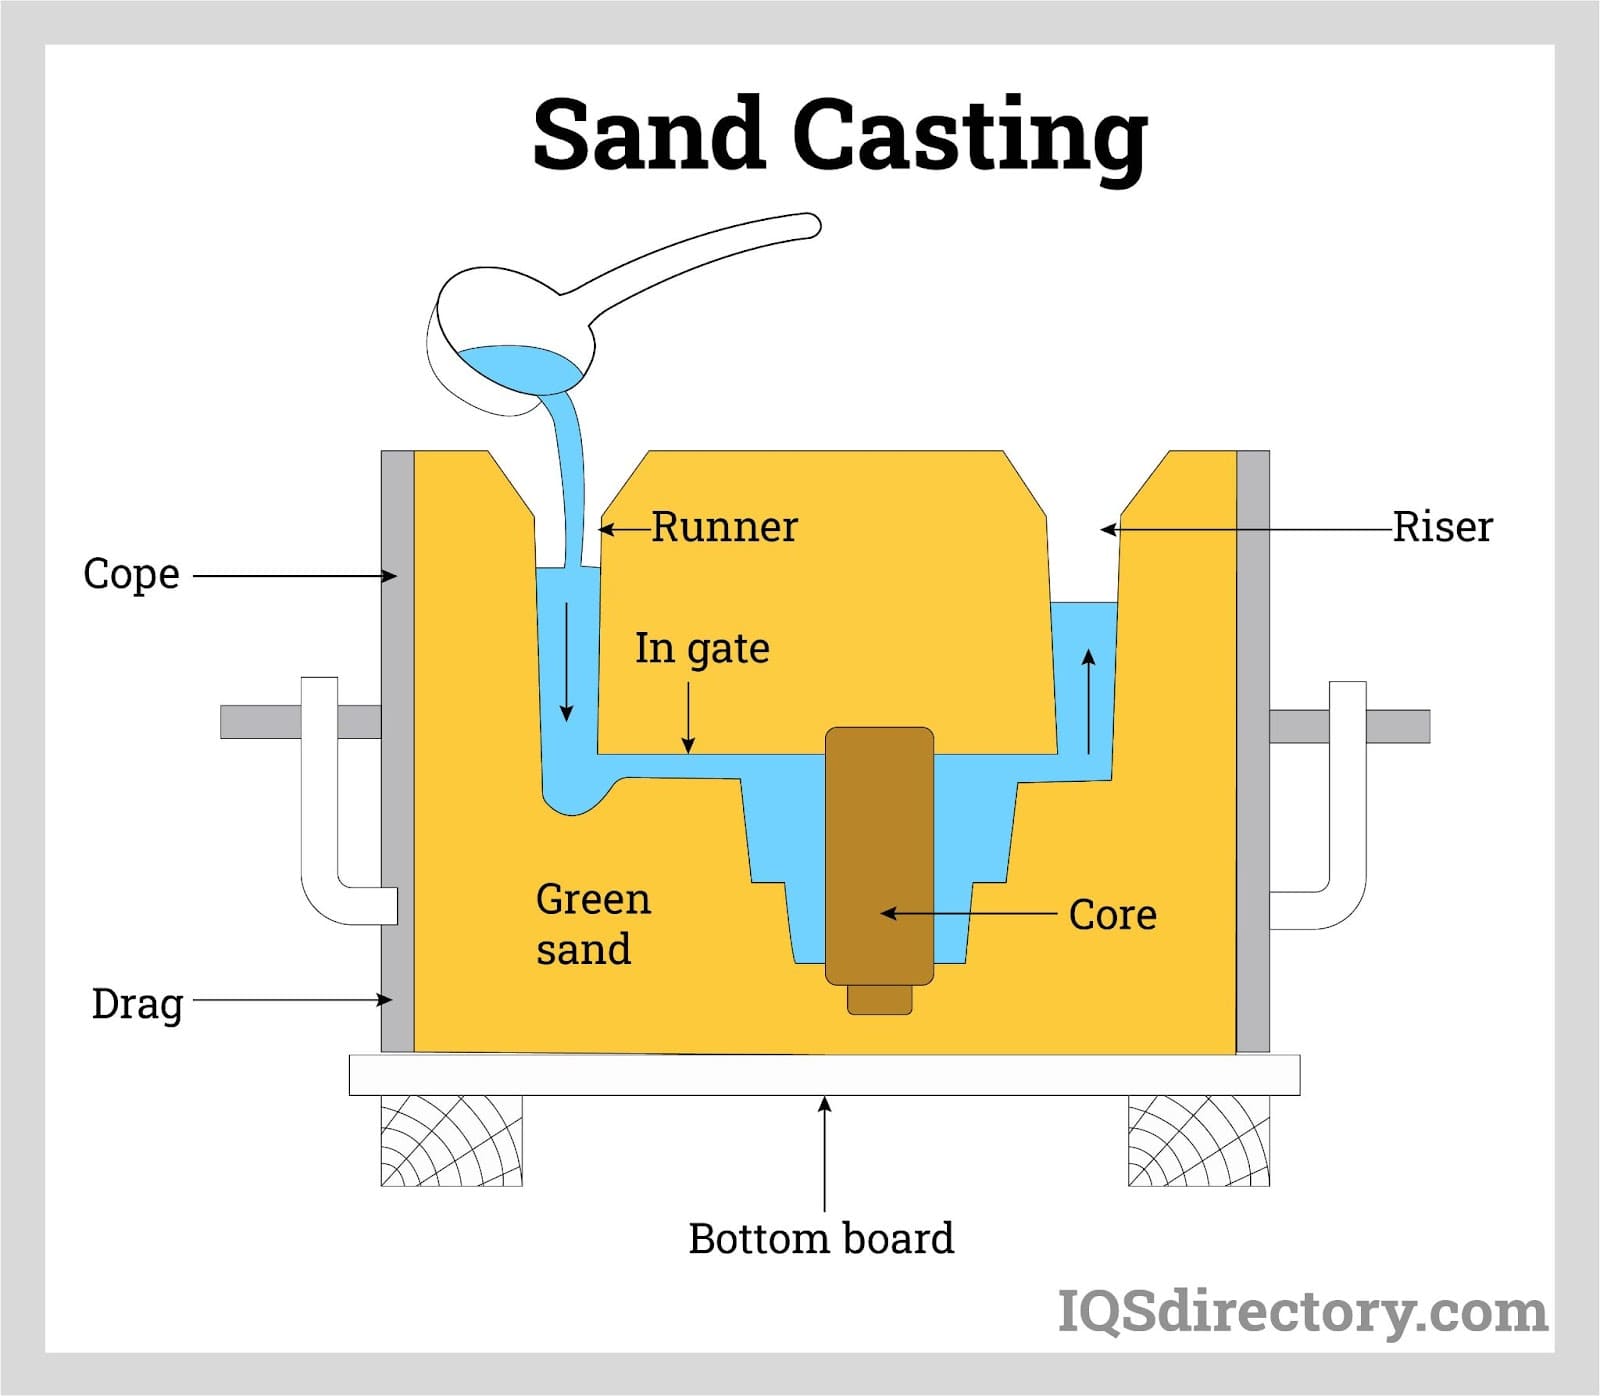
After the pattern has been created, the mold is prepared, which will further give the molten metal its desired shape.
The mold is typically made of two halves —the cope and drag—with the cope being the upper half, and the drag the lower half.
The cope and drag help form the cavity where the molten metal will be poured to create the desired shape of the casting.
To create the mold, sand is mixed with a binder, made of either clay or resin, to make it more cohesive and strong.
The sand that is used for creating the mold must be fine-grained and uniform in size to create a mold cavity with greater details and higher temperature resilience.
Aside from sand, sand-casting molds will also include the following elements:
Without the above elements, the proper shape and temperature settings cannot be reached.
As for the specific steps required to prepare and make the mold, the following process is used:
1. The sand is packed around the pattern in a wooden or metal box called a flask. The flask has holes or vents to allow air and gasses to escape.
2. The mold cavity is inspected for any defects or irregularities.
3. The two halves of the mold are aligned and joined together.
A sprue is usually made in the scope to allow the molten metal to enter the mold.
Without the mold, the pattern would not hold and the desired shape could not be accomplished, which is why the above-mentioned process of preparing the mold must be strictly adhered to secure the proper temperature-resistance and formation of the end product.
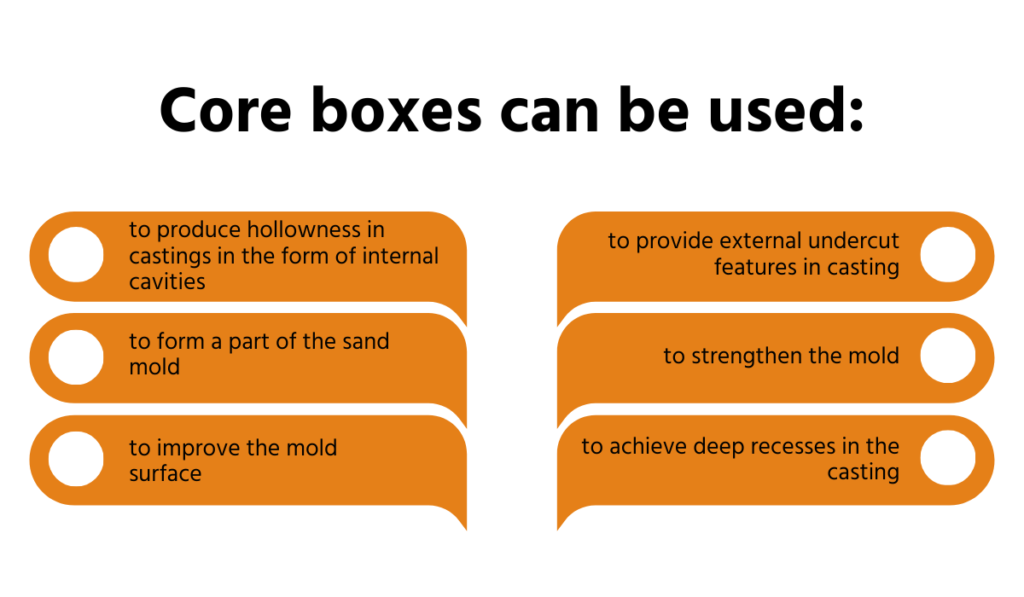
The third step of the sand casting process (i.e. core making) involves creating the internal features of the final product that cannot be formed by the mold cavity alone.
Cores are inserts made of sand or other materials that are placed into the mold to create voids (cavities) within the final casting.
Cores are made by using a core box, and the uses of core boxes are many:
The following steps are involved in creating the core box:
1. The core box is filled with core sand (sand with binder),
2. The core sand is compacted and shaped by the core box and then removed and baked to harden it.
3. The hardened core is then placed into the mold cavity before pouring the molten metal.
Core making is a very important step in the sand-casting process because it allows for more complex and intricate designs to be produced.
However, this step will add more cost and time to the process, and therefore should only be used when the overall casting quality and efficiency need to be increased.
During this step of the sand casting process, the mold and cores are put together to form the final shape of the casting.
This is a crucial step, as any misalignment or defect in the mold assembly can affect the quality and accuracy of the final product.
To assemble the mold, the following steps are taken:
1. The cope and drag are aligned and checked carefully for any gaps to avoid leakage and distortion of the molten metal.
2. Channels (runners and gates) are created and added for the molten metal to flow into and fill the mold cavity.
3. The cores are placed inside the mold cavity firmly in place, as any movement or displacement can cause defects in the casting.
Following the above three steps is necessary to ensure that the mold has the correct shape and dimensions for producing high-quality casting.
Failing to assemble the mold properly can lead to a variety of casting defects which can compromise not only the shape, size, and dimensions of the cast part but its quality and functionality, too.
Melting and pouring the metal requires attention and preparation, as not doing so can lead to many issues negatively affecting the quality of the final product, efficiency of the process, and safety of employees.
As far as cast quality is concerned, any error during this step of the sand-casting process can result in the following issues:

To avoid the above problems, the following tips should be considered before the melting and pouring begins:
This step of the sand casting process consists of several procedures that can be split up into two major phases: melting and pouring.
1. The appropriate metal for the casting is selected. A metal chart or a professional metal manufacturer can be consulted to aid in this decision.
2. A furnace that can heat the metal to its melting point is selected. The furnace can be gas-fired, electric, or induction-based, depending on preference and budget.
3. The metal is placed inside a crucible and the furnace is turned on. The temperature and the time of the heating process must be monitored carefully to ensure that the metal reaches its melting point and becomes completely liquid.
Once the metal is fully melted, the pouring phase begins.
1. The molten metal is poured slowly and steadily into the mold cavity through a gating system, filling it up completely.
2. The metal is allowed to solidify in the mold for a certain period.
As can be seen from the above process, melting and pouring the mold requires many steps that need to be followed to the letter to ensure the quality of the cast, efficiency of the process, and safety of the workers involved.
Failure to do so can potentially jeopardize not only the final product but also the health of all of those involved in casting it.
In the sixth step, the molten metal that was poured into the mold cavity begins to cool and solidify.
During this stage, the cooling rate is the most important factor, as it directly affects the microstructure and properties of the final casting.
Defects such as shrinkage, porosity, cracks, and distortion may occur if the metal cools too fast or too slow.
Several conditions influence the rate of cooling, including:
It is important to note here that, if a harder cast is desired, then the rate of cooling must be sped up.
In this instance, processes such as quenching can be added to accomplish this task.
Once the metal has been cooled, it is allowed to solidify into a solid casting that is identical to the shape of the mold cavity.
After solidifying, the casting is then removed from the mold by breaking or shaking off the sand.
The unique feature of sand casting is that the sand can be reused for making new molds after some cleaning and reconditioning.
Once solidification has been achieved, the second to last step of the process begins.
Shakeout and cleaning involve removing the casting from the mold and getting rid of any unwanted material that may have stuck to it during the previous steps.
Shakeout helps eliminate galvanizing embrittlement and cleaning helps improve the quality of the surface finish of the casting.
Aside from reducing embrittlement and a poor surface finish, the shakeout and cleaning process can also assist in the reclamation of sand, as well as proper material handling which can greatly reduce safety risks and material costs.
To ensure a proper shakeout and cleaning process, the following tips are suggested:
To clean excess material manually, a wire brush, a chisel, or a grinder can be used, whereas a shot blaster, a tumbler, or a sandblaster can be used to clean them automatically.
The surface finish of the casting should be checked with a profilometer to measure the surface roughness.
If the surface finish is not satisfactory, additional processes such as polishing, grinding, or coating may be needed to improve it.
The shakeout and cleaning process may vary depending on the type of metal, mold, and casting requirements.
However, it will generally involve the following steps:
1. A punchout ram is used to push the casting out of the flask while breaking up the sand mold.
2. The sand is separated from the casting by using a vibrating deck or a rotary drum.
3. High-pressure air or water is used to propel abrasive particles (e.g. sand, steel shot, and glass beads) at the casting.
4. Saws, shears, chisels, and torches are used to remove sprue, risers, gates, and other unwanted metal parts from the castings.
The process may involve as little or as many tools as needed to fully clean the casting and reveal the state of the surface and the overall quality of the final product.
However, if the surface finish is deemed insufficient, then the eighth and final step of the sand casting process will be needed.
The last step of the sand casting process consists of finishing the metal part.
This final step is needed if there is still “extra” material clinging to the casting even after cleaning it or if there are any rough patches on the surface of the cast.
Finishing can be done by various methods depending on the type of metal, the shape and size of the part, and the desired quality and appearance of the final cast.
The most common finishing techniques that are used in sand casting are:
Some examples of coating materials are paint, zinc, chrome, and nickel.
While the above finishing methods are the most common ones used in sand casting, other finishing techniques may be used to further enhance the surface of castings.
Some of these include:
If the surface finish does still not meet the requirements after the finishing process has been completed, then it gets repeated until it does.
Sand casting is a complex and delicate process that requires careful attention to detail and exact precision.
The eight steps of sand casting that were discussed in the above sections are essential to producing high-quality metal parts that meet the specifications of any given project.
If any of these eight steps are skipped, done incorrectly, or out of order, the results can be disastrous: defects, cracks, and deformations can occur that compromise the functionality and durability of the cast part.
Moreover, the sand casting process can pose various safety hazards to the workers and the environment if not done properly.
Therefore, it is important to follow the eight steps of sand casting in the correct order and with the appropriate equipment and materials.
However, even if these steps are followed to the letter, sand casting can still be challenging as it requires a great deal of skill and experience to produce successful castings.
That is why it is advisable to seek out the guidance of an expert metal manufacturer who can help with the process, ensuring that it is done in the best possible way and in the exact order to yield the best results.
They can also offer advice on how to optimize the process in such a way that will reduce costs and minimize material waste.