Molds give shape to the desired cast part as they contain a hollow cavity where the molten metal is poured to produce the part.
Without a precisely crafted mold, obtaining the perfect shape and dimensions would be nearly impossible.
However, not all casting processes require the same type of mold.
Different casting methods, such as sand casting, investment casting, and die casting, each have their unique requirements when it comes to mold design.
Therefore, understanding the intricacies of mold-making is essential for anyone looking to get metal castings for their desired components.
In the following sections, we will cover the six major steps involved in creating custom molds for metal casting.
Once you’ve gone through each one, you’ll have a comprehensive understanding of the process and should have enough knowledge to make more informed decisions about your metal casting projects.
Creating mold patterns for metal castings involves two important steps, which must be followed in sequential order. Otherwise, the mold may not meet the requirements of the desired shape.
The first step in creating mold patterns is designing the pattern itself.
This design will serve as a replica of the desired object to be cast.
The pattern design can be accomplished using advanced computer-aided design (CAD) software or through traditional manual drafting techniques.
Whichever method is chosen, the key is to capture all the intricate details and features of the final casting with utmost precision.
Once the pattern design is finalized, it is then transferred onto a specialized material called the molding board.
The molding board will act as a template for creating multiple patterns simultaneously.
After that is done, the task of crafting the master pattern, which involves shaping and carving the selected material according to the design on the molding board, is started.
This step requires utmost attention to detail and a keen eye to ensure that each pattern accurately reflects the original design.
When the master pattern is completed, it’s time to collect and prepare the materials needed to create the mold, which will be the subject of the next section.
The proper selection and preparation of various substances and materials for creating molds is key to securing molds that can withstand high temperatures and maintain their shape during the casting process.
A good casting-proof mold will be able to handle heat in the range of 800-1000 °F (427-538 °C) below the melting point of the metal being used.
Sand serves as the primary component for making molds and so should be the first material to be secured before mold preparation.
Sand is ideal for use in popular casting methods like sand casting because it is inexpensive and can withstand high temperatures.
Foundry sand containing silica is one of the more common varieties used due to its ability to maintain its shape under high heat.
However, before utilizing it, thorough cleaning and drying are necessary to eliminate impurities and moisture that would almost certainly negatively impact mold quality.
The second most important material in creating resilient molds is clay.
Clay acts as a binder, binding the sand particles together while offering dimensional stability during casting.
Bentonite and kaolinite clay are the two types of clay that are most commonly used in casting molds. They both offer exceptional binding properties and so are a good fit for sand molds.
Other materials besides sand and clay are also needed to create a strong and durable mold casting.
For instance, additional binders are often added to the mix as they enhance mold strength and so prevent mold breakage from occurring.
Binders act as adhesives, holding the mold particles together.
Either organic or inorganic compounds can be utilized as binders depending on how good their adhesive properties are.
Another vital material used for mold making is a refractory coating (i.e., a wash).
The refractory coating is applied to the mold cavity’s surface to increase heat resistance and facilitate smoother metal flow during casting.
Refractory coatings can be formulated using zirconium silicate, alumina, graphite, or even water-based solutions with ceramic particles suspended within them.
Depending on the specific casting requirements, other materials like metals or resins may also be needed.
Some casting materials need to be poured or injected into permanent molds made of steel, iron, silicone, or urethane.
Resins are needed when detailed patterns need to be replicated more accurately.
This is usually the case when manufacturing techniques like CNC machining are required to remove excess material from cast parts to fit specific shape requirements.
The careful selection and preparation of the above materials lay the foundation for creating successful molds for metal castings.
After the materials have been selected and secured, the next step in the mold-making process would be to create the drag mold.
Drag molds help create intricate and complex shapes during the casting processes. By using them, manufacturers can create precise and consistent parts with minimal defects.
They serve as the bottom half of a mold while the cope serves as the top half.
The drag mold houses all the necessary details and features of the desired shape and is the primary casting tool responsible for producing near-net-shape castings.
The first step in preparing the drag mold is, as we’ve already said, to select the right molding material.
After this is done, the following six steps should be adhered to sequentially:
The pattern should be placed onto the pattern plate, ensuring that the parting planes are in contact with it.
If the above steps are followed meticulously, then a flawless drag mold that serves as the foundation for intricate castings can be achieved.
The cope mold provides the space and structure necessary to shape the top half of the final casting.
When the cope mold is placed atop the drag mold, it forms a cavity that will eventually be filled with molten metal.
The cope mold cavity is responsible for creating the desired shape of the casting.
The desired shapes can include patterns ranging from intricate metal artwork to those forming industrial machinery components.
One of the primary advantages of using cope molds is their ability to create a consistent and uniform parting line between the two halves of the mold.
The parting line ensures that molten metal can flow smoothly and evenly into every nook and cranny of the desired shape during the molten metal pouring process.
To prepare a cope mold, foundry workers go through several meticulous steps, which is very similar to preparing the drag mold.
Cope molds can be made from either wood or metal, depending on the complexity of the design and the desired surface finish.
Preparing the cope mold can be summarized in the following four steps:
Once the cope mold has been assembled and secured and then placed on top of the drag mold, the pattern design can be removed.
Once the cope mold is placed on top of the drag mold, the pattern can be removed from both halves.
However, before separating the molds, it is necessary to apply a parting compound between them.
The parting compound acts as a barrier, preventing the two halves from sticking together.
To successfully remove the pattern, it is important to carefully inspect both sides of each mold half after separation.
The small fragments of the pattern can sometimes remain stuck inside the mold, therefore causing defects in the final casting.
After the cope mold has been separated from the drag mold, the following steps should be followed to remove the pattern:
After removing the pattern from both molds, the next step involves preparing the mold for assembly.
To enhance the performance of the mold and improve the surface finish of the final casting, the mold surfaces can be sprayed, swabbed, or dusted with a coating material before the assembly phase.
By following the recommended steps listed above, both molds will be ready for assembly, after which the pouring, casting, and cooling of the molten metal can commence.
The process of assembly will be discussed in the following section.
After the drag and cope have been separated and the pattern has been removed, it’s time to assemble the mold.
This step involves placing the cope into the cavity of the drag, followed by positioning the cope on top and locking the mold securely into place.
Before insertion, the cope needs to be painted, dried, and polished to ensure smooth and precise casting. Once that is done, the assembly process can begin.
Assembling the two halves of the mold is relatively simple and involves only two basic steps:
After the mold has been assembled, the casting process begins.
Once it’s completed, the mold needs to be carefully opened and the excess sand gently shaken off. Doing so ensures that the cope can be pulled away from the casting with relative ease.
In most cases, the cope is broken off, allowing for easy removal.
The above simple assembly steps complete the mold creation phase.
Attention to detail and precision during mold assembly and the other mold-creation steps discussed in the previous sections will significantly contribute to the overall success and quality of the final casting.
Each step of the mold creation process, from pattern creation to mold assembly, holds immense significance in ensuring top-notch final products.
By adhering to the six steps mentioned earlier, manufacturers can consistently achieve accurate results in their mold creations.
Following the detailed instructions listed above will go a long way in securing a mold that is right for your casting requirements.
However, it is still recommended that you seek out the guidance of a custom metal manufacturing expert who possesses the experience and knowledge of mold creation.
Their valuable insights are necessary for designing molds that accurately replicate the desired pattern and design of your specific metal casting project.
For instance, at Bunty LLC, all molds are created exclusively for the parts they manufacture in-house, allowing full end-to-end oversight of design, casting precision, and final product quality.
From a contract manufacturing firm, BuntyLLC evolved into a full service custom machined, forged and cast metal parts fabrication enterprise. We supply global solutions from our headquarters in Greenville, South Carolina.
Get A Quote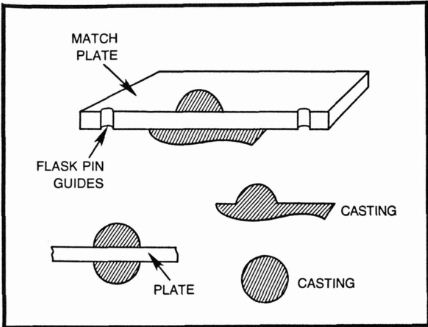